You’ve been asking for it and here it finally is! A tutorial for how I like to appliqué vines and similar quilt elements. I am using the pattern “One” by Quiltworx for my example.
The first thing you need to do is determine how wide you want your vein. I have 2 samples here. Captains Wheel is the first one, it has a very thin “rope”. The next is ONE and I used a wider cut strip for this one. I make a sample out of scrap fabric and just do the steps to see what I will like. Be sure to use contrasting fabrics for your sample.
This is “rope” on my Captain’s Wheel quilt. I have placed the dime so you can see how small this one finishes. This strip was cut 1″Here it is folded in half and stitched downThis one is 1 1/2″. Press wrong sides together, like a binding stripHere it is pressedStitch down with a straight stitch. All raw edges together. I used 1/4″ seam hereStitched – ready to ironNow iron!Do NOT trim before ironing! In this sample I did trim before ironing – OOPS!In this photo I trimmed the end before I ironed – DO NOT DO THIS! IRON FIRST!See what happened, after I pressed? The angle is wrong! Now I have 2 options, I can take the whole thing off and restitch — or – I can just trim the end of the leaf a little bit? What do you think I did?Now place the second side, leave each end a little long so you can fold it over for a nice finish. If you are comparing my sample to the pattern you will notice I switched sides for the long/short edges. It’s your quilt!
Stitch using approximately 1/4″ seam allowance, all raw edges lined upPRESS – this is the top of the leaf. See how much length I left?Pressed – determine how long you want the stem at the bottomCarefully trim and fold the end over for a nice finishThe stem at the bottom of the leaf after I have folded the end for a nice finish. I did take this back to machine and finish stitching to the end at the top and bottom.Choose your thread colors, I wanted mine to blend, you may want them to accent. You may also want to use your favorite invisible threadI used a button-hole stitch on this one, sometimes I use a tiny zig-zagThis is what the back looks like. The white straight stitch is from the first line of stitching I did. Then you see the yellow button-hole stitchAnd ONE is DONE!
I hope you find this tutorial helpful. I plan to do a few more so if you have any gentle critiques please post them in the comments.
Remember I am available to teach at your local quilt shop or your quilt guild. You can find my schedule here.
Last Thursday – Sunday I hosted a retreat for 10 fabulous women. The pattern we worked on was “Captain’s Wheel” by Judy Niemeyer. Held at the Wimberly Quilt Ranch in Wimberly, TX we found a little bit of paradise. Many of us even found time to enjoy the screened in porches and watch the deer, birds and squirrels. We were quite impressed by how much one particular squirrel could consume!
Our retreat was a HUGE success, much in part to Ronda, she was our cook and chief bottle washer. She even found some time to sew. Check out her blog for this retreat here.
This fabulous mother/daughter duo were attending their very first quilt retreat – they were so much fun! PS – they were also first time paper-piecers!As the blocks started being assembled – I started playing. The upper right is from a kit and will match the pattern cover quilt.As more blocks were assembled I had even more fun playing with the blocks! – My quilt is the multi-color in the lower left corner.Here is the gang as they jostled to take photos of the block compilation from their combined blocksA shopping trip to Valli and Kim in Dripping Springs yielded this great fabric for Jackie’s multi-color Captain’s WheelLinda shared how she makes a scalloped flange – (I am not sure I ever had there undivided attention like this!)Great demo and technique, thanks Linda!
We are just putting the final information together for our next retreat, which will be January 29, – February 1, 2015. The selected pattern is Fire Island Hosta, you can make the Wall Quilt or the Queen Size!
Hope to see you at a class or retreat in the future!
Be sure to check the schedule on the left side of the screen – I have been adding events for the coming months. There are 3 retreats scheduled for 2015 – post a comment if you want more information.
Today is Niemeyer Wednesday at Pinwheels and Posies. Each month I hostess an open sew for students that are working on their Quiltworx patterns from classes I have taught. They can come sew from 10-4 for just $10, WHAT A DEAL!
This is one of my favorite days to teach, they bring in their projects that they have been working on and we usually have at least 4-5 different patterns being worked on. Quite often I am asked to help them pull fabrics for their next Judy project and I always enjoy spending other peoples money!
Here are a few photos from April’s Niemeyer Wednesday…..
Millie’s been hard at work on her color wheel Mariner’s CompassThis Glacier Star is coming along!This Bali Wedding Star is going to be beautiful!Sails and Ropes going together for this Mariner’s CompassAlice is getting closer – she looks forward to Niemeyer Wednesday because that is her time to work on this projectPhyllis is making progress as wellSplit Log Cabin with Shimmer – this student chose not to “shuffle” the fabrics – I liked her colors so much that I am going to use Shimmer for Cabin Fever – call cut just need to start sewing!Sharon is pulling fabrics for her Captain’s Wheel – that batik chop is going to make a fabulous outer border!
Maybe I will get May’s Niemeyer Wednesday photos posted a little quicker!
In January I posted a quiz on my HollyDee Quilts Facebook page – How many of my own Judy Niemeyer Quilts Tops do I have to quilt? The answer was 11 – that was on January 16th. Today is February 1st and I now have an even dozen! I am so excited because I just finished my Captains Wheel Quilt Top, pattern by Judy Niemeyer. (Judy’s Original). (Someday I will count how many other quilt tops I have of my own to quilt!)
I started cutting the fabric on December 16th. (Remember I also am a long arm quilter and we had the holidays in there – I did not sew every day on this project, I just fit a couple of hours in here and there.
The fabric – time to chop it into little pieces…..see the tan and bright yellow in the back? They did not make the cut!
A fantastic rainbow of color – I hope this is as pretty as think it is going to be!
Lots of little pieces – the one in the very front here are the replacements for the tan and bright yellow
I think I am in love!
Look at the magic when you sew those little pieces back together to make a big piece of fabric again!When you take the time to spin the ends you get rid of that huge bump that makes it very difficult to quilt. And a very pretty pinwheel. Thanks to Ardelle from Canada for teaching me how to do this!I think I like this quilt!
See the fabric that randomly changes color around the smaller captains wheel block – that is the replacement fabric – much better than tan don’t you agree?
Corner picture –
If you have already made this pattern or are currently working on it – you will notice that my corner is different than the pattern. I added a line down the center of the corner so my color wheel would work it’s way around the quilt properly.
Overall photo – something is still missing!
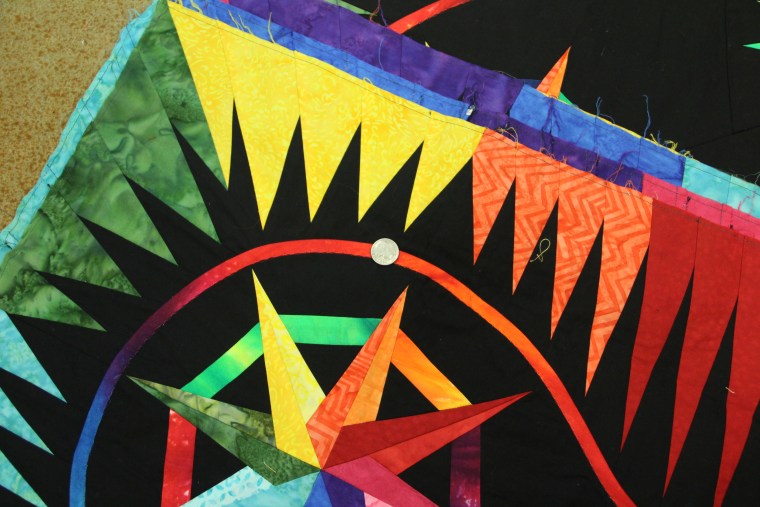
The original pattern includes a rope that undulates around the quilt between the border and the Captains’ Wheel blocks
The beginning of my rope – it is not finished here!
The rope really finishes it off and I love how the colors change as it goes around. I purchased the fabric at Houston International Quilt Festival in November with no particular project in mind – serendipity!
And now the overall with the rope attached – what do you think?
Now for some fun….. The pattern is “Captains Wheel” This is a companion quilt for “Mariners Compass”. Both of these quilts need names – do you have a good idea for a name?
Maximum # of students is 10 – sign up soon to reserve your spot!
Venue features include: big open spaces in the sewing room, design walls, comfortable chairs, wonderful lighting, ironing and cutting surfaces!
When: August 14-17, 2014. Check in at 11:00 am / check out Sunday at 3:00 pm
Price is $375 per person ~ this includes instruction from Certified Judy Niemeyer Instructor, Denise Green! That’s ME! It also includes lodging for 3 nights and your meals.
Contact our wonderful retreat organizer Ronda at ronda926@comcast.net for more information.
I have also been working on my Captain’s Wheel and I am having so much fun! I can’t wait to start putting it together.
Start with this! (But later take out that dull gold and the very bright yellow behind it!)Chop it up! What a pretty rainbow! (See those pretty pieces in the very front – that replaced the dull gold and very bright yellow!)Almost done with 72 A Units! Then I can start putting it together!Make some Captain’s Wheels!
If you aren’t available for our retreat, then be sure to check my schedule on the blog! Or contact me by leaving a comment on the blog!
If you would like me to come teach at your guild, local shop or retreat let me know and we will put something together!