Note: I have not created a blog in a really long time so hopefully this will all work….
So today a fellow shop owner shared this sentiment and it really hit home! Yes I have seen this many times over the years, but this year, 2020, more than any other has caused me to reflect on what really is my dream! It is being a quilt shop owner! Sharing my quilting knowledge with all of you and being an inspiration as best I can!
So a little back story! 1995 my friend Holly and I did a lot of crafts. We decided to sign up for a quilt class. The class was to be held at the original Thimbles & Threads in Draper, UT. It was a tiny little location with a screen door that went “whack” when it closed. Everyone was so nice and inspiring and I just knew I wanted to be a quilter! My husband ventured to this shop with me at some point and made a random comment about one day I would own a quilt shop! Seed is planted but I did not realize it at the time.
Fast forward to 2015, yes 20 years later! We have moved to Luling and are blessed beyond belief! He is chauffeuring me to one of my teaching gigs – where I will show pretty quilts I have made and hopefully inspire a few quilters to try something new! He asks if I have thought about opening a quilt shop! Well in my mind that seed that was planted 20 years prior is now a TREE! and I have permission! I start looking at properties in our town and a local quilter, who is also a building owner has just completed renovation of an old building on the main drag of town – and it is beautiful! This was our home for just over 2 years and then our wonderful building owner made it possible for us to move to one of her other locations and we now have an amazing location and a huge classroom. In June when we could finally invite quilters back to sew and we heard the giggling and visiting that occurs in a quilt classroom we knew we were back! 2020 you have been a tough one – but we are going to survive!
Thank you to each and everyone of you that follow us on Facebook, Instagram, our website and our store! We are here for you and we are grateful you are part of our dream!
Dee and the crew at HDQ – including Corey, Lindz, Liz and Michelle!
Countdown to Christmas!
We have decided to post ALL of our specials for our Countdown!
You can choose which day(s) to come visit! Sale is limited to STOCK ON HAND – NO SPECIAL ORDERS!
December 5th – Books & Patterns (but not Judy Niemeyer!) 25% off
6th – All Christmas fabric is $25% off! Yippee!
7th – If it has a stripe – it’s on sale! 25% off!
8th – All FAT quarters are $2.00
9th – Batting including Fusible Fleece – 20% off
10th – Judy Niemeyer Patterns – 25% off
11th – Batiks are on sale for 20% off!
12th – Coloring Fabric – if it is Crayola licensed or fabric for coloring on! 25% off
13th – The entire COLOR WALL is on sale 15% off
14th – KITS KITS KITS! Kits are on sale $15% off
15th – FAT QUARTER BUNDLES are 25% off
16th – SOLIDS are on sale 25% off
17th – Gift Certificates! Purchase a gift Certificate for $50 and only pay $45
18th – BLACK & WHITES are on sale – 25% off
19th – Western Fabrics are on sale – 25% off
20th – Notions are 25% off – get your favorite tool today!
21st – WIDE BACKING FABRIC – is 30% off! That’s right 30% off!
22nd – All Panels are 25% off as well as their companion fabrics!
Thank you for signing up for HollyDee Happenings! (Your Mother would be so proud!) It’s the best way to keep up with Sales, Events, and Classes at Luling’s Newest Quilt Shop!
Earlier this year as I was meeting with fabric reps they would ask about my Halloween collections – I told each of them I wasn’t going to order much for halloween as I wasn’t confident I would get samples done and did not want to end up with bolts and bolts of Halloween fabric.
And then I would purchase a full line of Halloween fabric from each rep! What was I thinking!!!
So…..we have lots of fun Halloween fabrics and we have several samples in the shop for you to see. I am going to showcase them here on the blog as I have a chance!
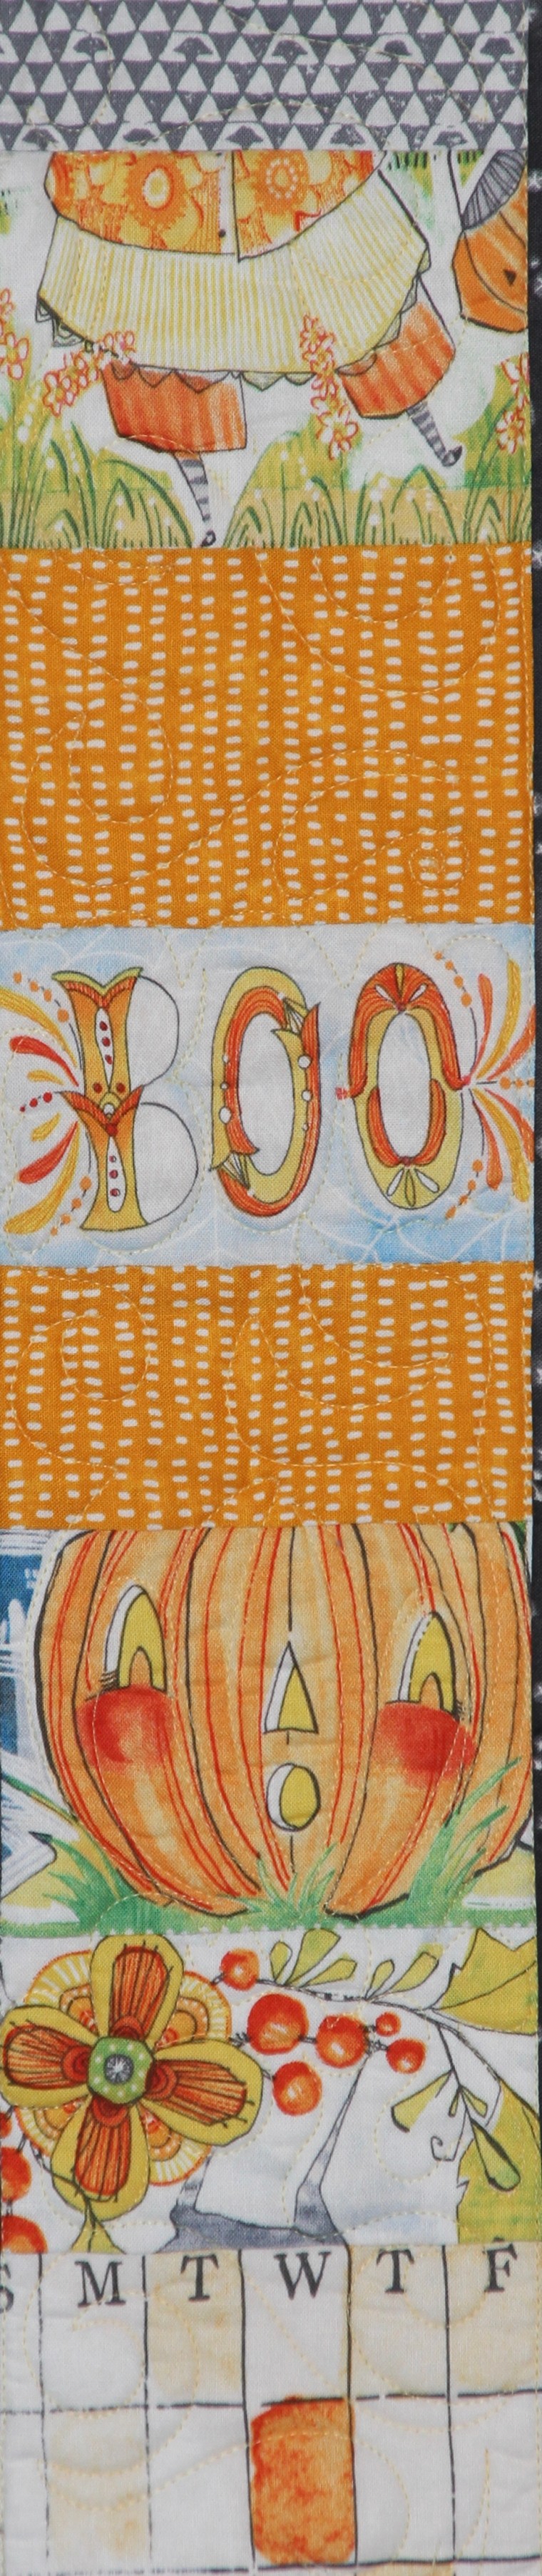
This one is called Spooky Town and the designer is Cori Dantini from Blend Fabrics, I just love this artist! We have 3 other lines from her in the shop and 2 more on order….. once again – what was I thinking????
This was the free pattern on the manufacturer site – cute enough – but we really wanted to showcase these cute cute cute fabrics….
So I used the foundation from the free pattern but then changed out some of the fabrics and changed up the piecing and here is what we have for you…. this quilt is cute and fun to make – the fabric arrived on Monday and we had a quilt top done by Thursday (and I was in Houston on Tuesday!) Quilted free-hand with my favorite whimsical style of sort of custom! Kit price is $60 and includes the pattern, all fabrics for the top and binding.
And here are a few close-ups….
After Row by Row ends you will find us ecstatically putting our fall spook on!
Good Morning! I was searching through my blog the other day for something and realized I really miss blogging and sharing (in more depth) what I am up to these days! SEW – from now on I will be blogging more frequently to let you know what I am working, what we have new in the shop, where I am teaching etc.
First of all – thank you to all that have stopped by the shop since we opened – we are grateful. In our effort to show our gratitude we have a monthly give-a-way! July we gave away this quilt! Fear not – I have a pattern available if you did not win but would still like to have this festive quilt to show your love for the USA!
I also want to share this adorable quilt with you – the fabrics are by Cori Dantini – my new favorite fabric designer! My granddaughter is part of an acting ensemble and her very first play was “Into the Woods” and she played the granny – so of course I had to buy this fabric collection! We have this wonderful kit available for you! Call us for more information!
I have been asked to help Quiltworx complete a quilt for the new technique of the month – Vintage Rose! The color way is designed by Judel and the fabrics are from Island Batik!
Here is what I have done so far – be sure to “follow” the blog to stay up to date!
You can also keep up to date with our shenanigans on Facebook and Instagram – both under HollyDee Quilts!
One of my students made this beautiful Mariner’s Compass; then I was asked to quilt it! She patiently waited for this quilt to move up the list of quilts to be quilted! I sent her a couple of sneak peek photos once it was loaded. But this did not prepare her for what she would receive – upon receipt of the quilt and shams her note to me said simply “It Came! It takes my breath away!” Another happy client! Her quilt was so stunning to begin with – the choice of classic colors made this an amazing quilt to start with. She had sent me a pieced back originally. Then it was determined she would need to send me a different back; I must say I was so excited to use the new backing as I knew the quilting would be stand out!
2015 was a busy year for us. We had just moved into our new home.
In the studio we had shelving to build, peg board to hang, cabinetry to place. Lots of rearranging as I decided to tweak things, 256 sf of design walls to put up.
Join local groups; Luling Fiber Arts. Create new groups; Settlement Magnolias. Just to name a couple…
My travel included a cruise where I was teaching, NQA in Little Rock where I was teaching and vending, Montana for a tune-up and so much more. My treasured time is when I am quilting with long-time friends and we are enjoying each others company (or when I am with my hubby!)
48 Retreat/Quilt To You Wilt/Cruise days, most of these where a taught, but a couple where I was a lucky participant! 6 visits to guilds to provide lectures and workshops! 22 workshop days at various shops usually involving 2 or more hours of travel each way! 6 shows including NQA in Little Rock. 1 Guest Artist appearance at a show where I was a vendor had a special exhibit and daily bed-turnings.
4 days of Farm Camp for the Grandkids, 7 days of Camp Dee-Dee with the Grandkids! Enjoyed 2 plays that my granddaughter was in, baseball games for the grandson as well as other family time events!
And along the way I finished a few quilts, a couple of them were started prior to 2015, but many were started and made it to top stage in 2015. I also quilted several quilts for customers (but not as many as I used to!)
Here are most of the finishes for 2015….
The original “One” was my first finish of 2015. Be sure to look at the close-up photo of the beading a fellow quilter added for me!
While in Little Rock a delightful quilter offered to bead my quilt for me – it was already quilted but she very carefully hand stitched each bead on, only going through the top layers! She even put the binding on it before shipping it back to me! I just love quilters! Pattern “One”
My 2nd “One” of the year! I have another one that just needs the leaf stitched down! I look forward to teaching this quilt again and again! It is fun!
Paradise in Blooms, started, finished, quilted and bound in 2015! WooHoo!
A beauty that was started this year – but I may need to go visit my friend Lisa at Compass Point Quilts in NH to finish it!
Tea Time Placemats. I love making these leaf quilts. I have kits and patterns available at my online store.
Vintage Compass – made as a sample for Pinwheels and Posies in Dickinson, TX. They have kits!
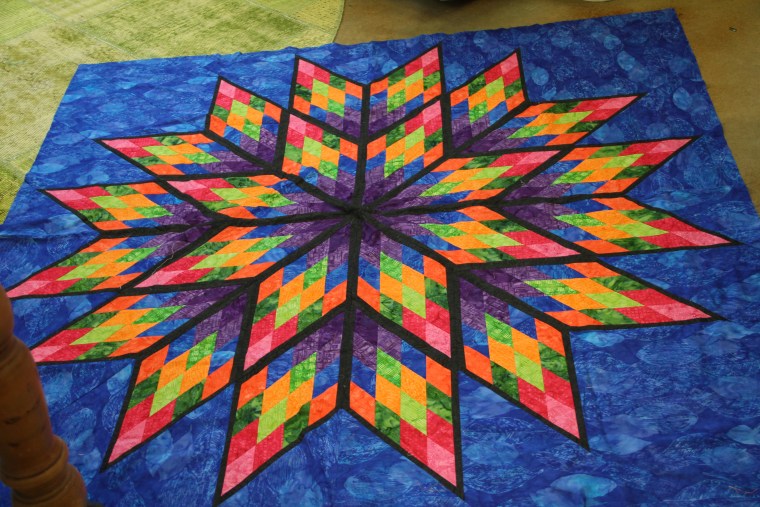
My 2nd Prismatic Star of the year. I cannot get enough of this quilt! It is so quick and easy to make. Kits and pattern available at my online store.
Paddlewheel using Judy and Judel Niemeyers fabric collection, Reclaimed West. Pattern is still available at my online store. All fabrics were donated by Timeless Treasures and I did a 2 part blog tutorial for how I made this quilt. See part 1 here.
Landscape table runner made and kitted for the cruise I taught on in May. All kits are pre-cut ready to sew! Including the papers for one table runner. Kit includes papers to make 3 more quilts, they just aren’t precut! I have included a photo of the back of this quilt so you can see my “upside down” quilting!
The back of my Landscapes Table Runner so you can see the quilting. This backing fabric was approx 24″ wide, purchased on Maui in 2001, just waiting for the perfect quilt.
A small sample made to show the fabrics in kits I have available when teaching Seasonal Table Runner/Table Topper.
This quilt is at Hancocks of Paducah right now so I am using the new coversheet for the photo. I made this quilt for Quiltworx, while I was there in July. Constellation is from the book Geese Migrations; available on my site!
Vintage Compass made for Certified Shop Pinwheels and Posies. Kits available from them!
Osprey’s Nest, downsized. OK I got really tired of making geese – so I figured out what I could make with all those fabulous log cabin blocks and the geese I had done. So far 1 table topper, 1 table runner and 2 placemats. I will also have the mirror image of the table topper when I am done! Pattern available on the site!
Dancing in the Moonlight! A silhouette of my granddaughter from a photo where she was dancing at camp in 2014. A friend took the tiny photo and made it life size for me. The blocks in the background are Garden Wall and available on the site. I used an ombre for my backgrounds and a Judy Niemeyer Bali pre-sorted Pops set for the accents.
Some of the piecing for this quilt was started many moons (aka years) ago. AndSewItBegan asked me to come teach this at her retreat house so I figured I better get it together. I used a Kaufman Khaki for the background and hand-dyes for the accent fabrics. This pattern is Southern Beauty aka Sleeping Beauty by Sue Garman. Don’t you love Sue’s work?
This year I joined the Luling Fiber Arts group and our leader, Kelly, taught us how to make this fun convergence quilt. This quilt is small but was made in 2 hours, including all cutting!
Those are all silks on the wall, my WoodCarvers star is in progress! Any bets on a finish date? Pattern uses the new lone star technique and is available on the site!
I cannot take all the credit for this one. Most of the paper-piecing was done while in Montana, but not by me. My 3 Australian friends did not bring enough of their own projects so they worked on mine! This quilt is called Chasing Rainbows and can be found in the Geese Migrations Book (available on this site). I used 2 different ombre fabrics for the color and black batik. I hope to have kits for this quilt very soon.
These 4 quilts were completed by me to be donated to our local first responders! They will be quilted very soon!
My version of Prairie Pinwheels. This quilt was fun and easy to make and I was able to use all stash fabrics! What a great quilt for a young child! Pattern available at my online store.
Not finished but wanted to include it. I need to piece and add the borders. This pattern is called Indian Summer and is available at my online store. This sample is made with lots of Kaffe Fassett fabrics and black/whites. All purchased at Pinwheels and Posies Quilt Shop.
Diamond Wedding Ring NEW version! I made the original version many many years ago and let me tell you it was not for the faint of heart. There were at least 8 billion Y seams! This quilt is assembled with ZERO Y seams. Quick and easy paper-piecing and custom creative grids rulers make this quilt a snap! Rulers and patterns available in the store! All fabrics (except the outer border) were purchased in June 2015 from Valli and Kim in Dripping Springs, TX. The background has all kinds of appropriate sayings for a couple in love!
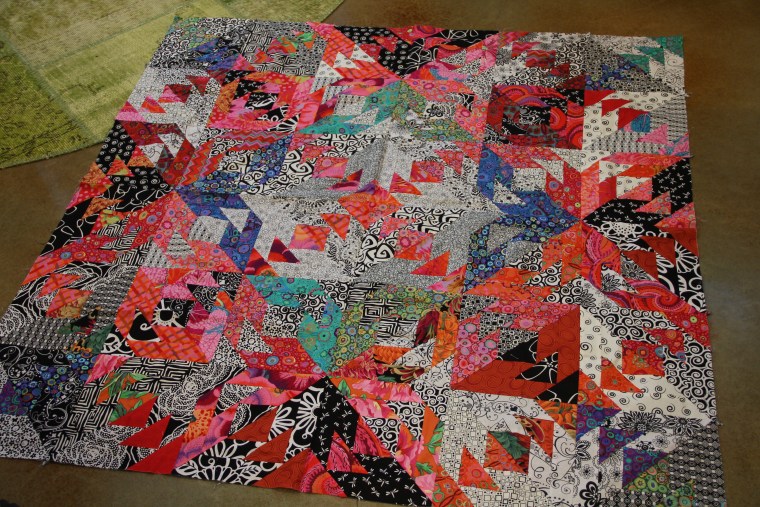
Fractured Paint Box – she’s a little loud but was so fun to make. The center is made from a very dark green accent and Kaufman solids strip set. The border was left over backing from a wedding quilt I made a couple of years ago; purchased in Maui when we attended the wedding! I love destination weddings – how about you?
I have ended the year with “Three” I started this on Christmas Day, it went very quickly. Kits will be available on my site soon! This one is called Lemons, Limes and Satsumas; we had those 3 trees in our backyard before we moved. Picking fresh fruit around Christmas each year and burying your nose in the fabulous blossoms each spring. I miss those trees!
A year in the review. Of course there are other quilts that are started but I did not include! I have to save something for next year right? (as I look at this photo I realize there is one here that did not get featured above)
You’ve been asking for it and here it finally is! A tutorial for how I like to appliqué vines and similar quilt elements. I am using the pattern “One” by Quiltworx for my example.
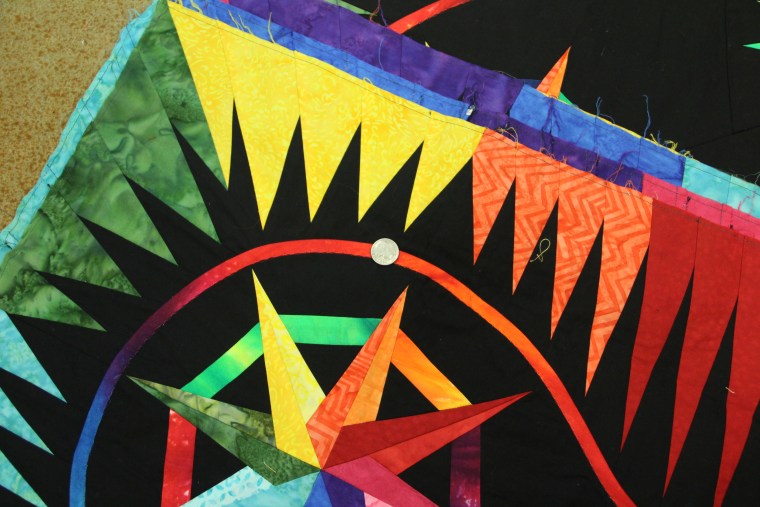
The first thing you need to do is determine how wide you want your vein. I have 2 samples here. Captains Wheel is the first one, it has a very thin “rope”. The next is ONE and I used a wider cut strip for this one. I make a sample out of scrap fabric and just do the steps to see what I will like. Be sure to use contrasting fabrics for your sample.
This is “rope” on my Captain’s Wheel quilt. I have placed the dime so you can see how small this one finishes. This strip was cut 1″
Here it is folded in half and stitched down
This one is 1 1/2″. Press wrong sides together, like a binding strip
Here it is pressed
Stitch down with a straight stitch. All raw edges together. I used 1/4″ seam here
Stitched – ready to iron
Now iron!
Do NOT trim before ironing! In this sample I did trim before ironing – OOPS!
In this photo I trimmed the end before I ironed – DO NOT DO THIS! IRON FIRST!
See what happened, after I pressed? The angle is wrong! Now I have 2 options, I can take the whole thing off and restitch — or – I can just trim the end of the leaf a little bit? What do you think I did?
Now place the second side, leave each end a little long so you can fold it over for a nice finish. If you are comparing my sample to the pattern you will notice I switched sides for the long/short edges. It’s your quilt!
Stitch using approximately 1/4″ seam allowance, all raw edges lined up
PRESS – this is the top of the leaf. See how much length I left?
Pressed – determine how long you want the stem at the bottom
Carefully trim and fold the end over for a nice finish
The stem at the bottom of the leaf after I have folded the end for a nice finish. I did take this back to machine and finish stitching to the end at the top and bottom.
Choose your thread colors, I wanted mine to blend, you may want them to accent. You may also want to use your favorite invisible thread
I used a button-hole stitch on this one, sometimes I use a tiny zig-zag
This is what the back looks like. The white straight stitch is from the first line of stitching I did. Then you see the yellow button-hole stitch
And ONE is DONE!
I hope you find this tutorial helpful. I plan to do a few more so if you have any gentle critiques please post them in the comments.
Remember I am available to teach at your local quilt shop or your quilt guild. You can find my schedule here.
A couple of weeks ago I was the guest speaker for the Victoria Area Quilt Guild! They are a very busy guild! And so many nice ladies! It was great to see all the familiar faces in the group too – many of these ladies had been on the Quilting Cruise earlier this year!
They meet on the 4th Thursday of the month – you can learn more about them here.
Here are a few of the show and tells from their guild meeting!
From a previous workshop
A smaller option from the same workshop.
Love the arrangement on this one….
Happy colors!
This redwork was done by one guild member and another guild member made the quilt. Exquisite needle work on the redwork.
A great setting for those prints that scream to be seen.
And this adorable barn quilt for a young child – when I grow up I want to needle turn like that!
Beautiful appliqué mixed with log cabin blocks. The subtlety of the colors really was very attractive
A fun little woven project
This is their October workshop – I really would love to learn how to make this quilt! (I will be in Houston at Market)
Love how the block ending!
This Show and Tell is our CRUISE QUILT!!! Quilted and Bound with Applique!
After the meeting and a quick bite to eat we started our workshop. Compass Rose Table Runner! This is a great pattern and the there are enough papers included in the pattern to make 2 table runners. This block is also the center for Mariner’s Compass (retreat in October). It is also a featured block in Captain’s Wheel.
Here are a few photos from the workshop.
Workshop Photo!
Workshop Photo!
Lined up and ready to SEW!!!
Workshop Photo!
Workshop Photo!
Workshop Photo!
Workshop Photo!
Workshop Photo!
Thank You Quilt Guild of Greater Victoria! I had a wonderful time!
Get on a boat! And sail the high seas with a bunch of fun quilters!
A special thanks to Veronica Cox of Bear Threads Designs for coordinating of our Quilters Cruise!
I would also like to acknowledge the minute of silence held on the ship to remember the reason we have Memorial Day! Several tributes were held through-out the ship during our week on board! The folks in TX were always on our mind as the state experienced un-precedented flooding over the Memorial Weekend and days that followed!
Our view as we were getting ready to leave Galveston in a drizzly rain on board The Navigator of the Seas for 7 days of fun packed sewing, sight-seeing and sipping! (Be sure to read to the end as you will not want to miss the final photo!)!
Who else sees flying geese?
Our first full day at sea was a class taught by Winnie Fleming. All of her kits were pre-cut and the students got right down to sewing! Our machines were Janome Horizon machines and were provided by Scott from Citrus Sewing Center of Ocala, FL.
The blocks and setting for the quilt Winnie chose for her class! Made with Hoffman Bali Pops, pre-cut by Winnie to the perfect size for piecing the blocks!
Another pretty one!
This photo is straight – the quilt on the design wall? Not so straight! Were the seas that rough?
Kat photo bombing!
One of 7 Linda’s hard at work!
Sara’s quilt is going to be fabulous!
The evening class was taught by Susie Seed, she is an educator for Sulky! She had a fun project called split personality and students were able to try all kinds of threads and stitches while constructing their projects.
Susie Seed – Sulky Educator! And a fun lady!
Split Personalities – make two faces, slice them down the middle, swap them around and you have a split personality!
Split Personalities – make two faces, slice them down the middle, swap them around and you have a split personality!
Split Personalities – make two faces, slice them down the middle, swap them around and you have a split personality!
Split Personalities – make two faces, slice them down the middle, swap them around and you have a split personality!
Split Personalities – make two faces, slice them down the middle, swap them around and you have a split personality!
Split Personalities – make two faces, slice them down the middle, swap them around and you have a split personality!
Split Personalities – make two faces, slice them down the middle, swap them around and you have a split personality!
My day to teach did not arrive until day 5 of the cruise, after 3 port days, Cozumel, Belize and Roatan. I was worried my students would be worn-out by this point as they had had a busy several days so far. But, my fears were quickly set aside, they were all excited and ready to jump in and learn something new! Only 1 photo from my class because I was having too much fun sharing my passion for paper-piecing!
The quilt I taught on the cruise. Landscape Table Runner – The only photo I took during the class!
There is so much to do on the ship!
When we weren’t sewing or sleeping, we were sight-seeing or enjoying ship performances. I did not take photos at most of the performances, we saw an ice-skating show, a tribute broadway, karaoke, comedians and lounge acts. My favorite was when the staff performed on the promenade with a tribute to the 70’s including The Village People! If I had not been laughing so hard I might have been able to snap some photos!
On the promenade getting ready for the circus parade
One of the interior cabins, someone was peeking out to watch the parade. Hubby and I had a cabin on deck 2 (by the ice-skating rink)
Some of the circus parade performers
The camera setting was just a tad off!
Highlights from our excursion to Cozumel….
Our first port was Cozumel, I had been here a very long time ago, probably over 30 years ago. The island has really grown up. It has a community college, a Sam’s store and lots of restaurants and shopping.
We chose a short Mayan Ruins tour and scenic overview.
We chose a short Mayan Ruins tour and scenic overview.
All of the stones for the ruins were “mined” from underground tunnels! There are miles and miles of tunnels under the island where the stones used to be!
The scenic overview! This side of the island is still in its natural form except for a couple of roadside tourist shops. No resorts etc.
My handsome man!
We are back on board the ship – watching other passengers que up to board.
2 smaller carnival ships were also in port.
Our group after the 2nd formal dinner. A big thank you to my husband for being our photographer!
Our group after dinner Friday evening!
Our group after dinner Friday evening!
Our group after dinner Friday evening!
We skipped early dinner one evening which meant I got to see a sunset!
I may not have dipped my toes in the ocean or the pool BUT I did see ONE sunset!
Sipping with our 3 favorite bartenders! Thanks Alice, Elle and Juana for keeping us entertained and “hydrated!” Our favorite place on the ship was the R Bar winding down with friends!
Alice! Classic beauty and charm! And a GREAT bartender!
Elle preparing cocktails!
Shaken!
Double-Time!
Juana – the boss! After giving the girls several dark chocolate bars we were in big trouble because they stayed up til the wee morning hours!
A whole lot of shaking going on!
They know when to stir it and when to shake it!
The essence of Juana!
Winnie, Linda and Me posing in the big framed chair – time for a little unwind!
Yesterday I decided to load a quick quilt on the frame. A very cute umbrella quilt from Ronda at And Sew it Began. But of course I had to take a quick project and complicate it – as I talked to myself I decided I should do a different background fill in each block. There are 30 blocks. My brain can quickly think of about 10 fills and then it gets stumped. Oh yeah I also decided to alternate the fills between something with straight lines or grid work vs a more flowing or rounded design. Needless to say I had out all of my modern quilting, doodle quilting and any other book that may give me some more ideas!
Here are the photos – Ronda will get her quilt tomorrow when I see her in Wimberley for our Fire Island Hosta Retreat – she is our chef!
Umbrella Blocks using prints and batiks!
Some of the fills that I used for the quilting
Some of the fills that I used for the quilting
Some of the fills that I used for the quilting
Some of the fills that I used for the quilting
Some of the fills that I used for the quilting
And a look at the backside!
And a look at the backside!
We have been having some fabulous weather here in South Central TX – lots of sunshine and 70’s my kind of weather!